PHARMA Southern Africa
PHARMA Southern Africa ALLERGY-CHECK® | ALLERGY-CHECK® — at-Home
PHARMA Southern Africa ALLERGY-CHECK® | ALLERGY-CHECK® — at-Home
Nappi code: 1165159001
Couldn't load pickup availability
Low stock: 3 left

 Approved by Experts
 Personalised Health
 Delivered Nationwide


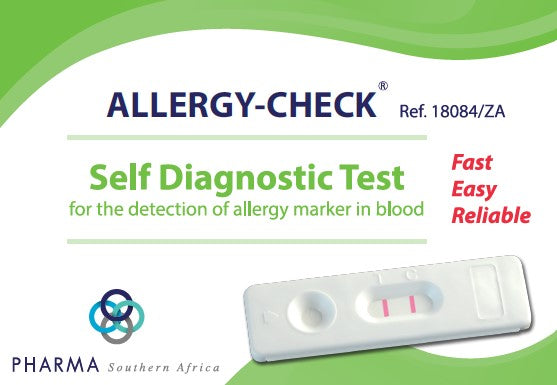
Pharma Southern Africa ALLERGY-CHECK® — at-Home Allergy TEST Kit
Elevated levels of circulating immunoglobulin E (IgE) antibodies serve as key physiological indicators of type I hypersensitivity reactions to common environmental and dietary allergens. The ALLERGY-CHECK® rapid diagnostic assay utilizes a highly specific lateral flow immunochromatographic method to qualitatively detect elevated IgE levels from a small capillary whole blood sample. By identifying systemic IgE concentrations that exceed standard physiological thresholds, this diagnostic tool assists in differentiating atopic allergic manifestations from viral or bacterial infections. This home-use kit delivers clinically reliable results within ten minutes, enabling individuals to initiate informed consultations with healthcare professionals for targeted therapeutic management.
Product Description
Individuals with allergic sensitivity to various substances such as pollens, animal hairs or feathers, or some foods, have abnormally high levels of IgE (immunoglobulin E) antibodies. That sensitivity can be developed in different moments of life, but can affect children, teenagers, and adults. The main allergy symptoms are redness on the skin, rash, lacrimation, repetitive sneezing, and oedema. Those symptoms can be mixed up with usual signs of viral and bacterial infections such as flu, cold, and bacterial sore throat. That is why it is important to CHECK® if the IgE level is abnormally high in those cases or in subjects having family history of allergy.
Through determining an immunoglobulin E level higher than the average, the doctor can direct to a more specific search for substances causing allergic manifestations, and can define a therapy adapted to the patient.
With ALLERGY-CHECK® by PHARMA Southern Africa you can assess IgE levels in blood and detect any allergy sensitivity.
When Should the TEST Be Performed?
ALLERGY-CHECK® should be performed in the case of symptoms that can be associated with the allergy, such as rashes and redness on the skin, lacrimation or repetitive sneezing in presence of dust or in contact with animals (dog, cat, etc.), or appearance of oedema after ingesting particular food.
WHAT Do I Have to Do If the Result is Positive?
If the result is positive, it means that the IgE (Immunoglobulin E) antibodies level in blood is higher than the norm and that you should consult a doctor showing him the test result. Then, the doctor will decide whether additional analysis should be performed or will recommend you to consult an allergist.
Included in KIT
A sealed aluminum pouch containing:
- 1 test device, 1 plastic pipette and 1 desiccant bag
- 1 sterile lancet for blood sampling
- 1 dropper bottle containing 1 mL of diluent
- 1 instruction leaflet
- 1 alcohol pad
How to USE
Testing procedure always starts with a good preparation. Place the content of the box on a clean, dry and flat surface (e.g. table). Then the testing follows:
- Wash your hands thoroughly. Use soap and warm water. Dry your hands with clean towel.
- Prepare the test device and the pipette. Take them out from the protective pouch (tear at the notch) and place them in the reach of your hands (you will need them later). Discard the desiccant bag.
- Prepare the lancet. Hold the lancet without touching the trigger button. Unlock the lancet cap twisting it off 1⁄4 turn until you feel it separates from the lancet and then continue twisting it (2-3 rotations). Don’t pull just twist and discard the cap when finished.
- Clean the end of the middle finger or ring finger with the alcohol swab. Rub the chosen finger towards the tip for 10 to 15 seconds to enhance the blood flow.
- Press platform firmly against the lateral side of the previously cleaned finger and press the release trigger button.
- The tip will automatically retract into the body of the device.
- Rub the finger’s end to obtain enough whole blood sample.
- Without pressing the bulb, put in contact the plastic pipette with the blood sample. The blood migrates into the pipette through capillarity to the line indicated on the pipette. You may rub again your finger to obtain more blood if the line is not reached. As far as possible, avoid air bubbles.
- Put the blood collected with the pipette into the sample well of the device, by pressing on the pipette bulb.
- Wait 30-40 sec for the blood being totally absorbed into the sample well. Unscrew the blue cap of the diluent dropper bottle (leave the white cap tightly screwed) and add the diluent as follows:
Hold the diluent dropper bottle vertically and slowly add exactly 4 drops in the sample well of the device with an interval of 2-3 seconds between each drop. - Read the result after 10 minutes. Do not interpret after 15 minutes.
Click here to view the patient information leaflet.